
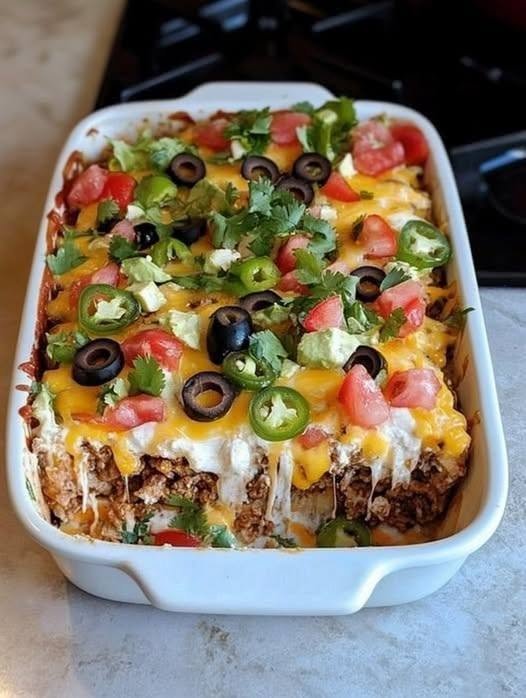
🌮🧀 Weight Watchers Cheesy Mexican Taco Casserole
A Cozy, Cheesy Taco Night Favorite the Whole Family Will Love
There are nights when I want a dinner that feels like comfort food without spending half the evening in the kitchen. That’s exactly where this Weight Watchers Cheesy Mexican Taco Casserole comes in.
I made this for my family last weekend after one of those days when everyone seemed hungry at the same time. I had ground beef in the refrigerator and a few taco-night staples in the pantry, so instead of making individual tacos, I decided to turn everything into a casserole.
It was such a good decision.
As soon as the cheesy casserole came bubbling out of the oven, everyone gathered around the kitchen. The smell of seasoned beef, salsa, and melted cheese was enough to make us all hungry again—even though we’d been talking about dinner for the previous hour!
We served it with fresh lettuce, tomatoes, salsa, and a little nonfat Greek yogurt. Everyone loved it, and there was just enough left over for lunch the next day.
Since then, this has become one of those recipes I reach for when I’m stressed and don’t want to think too hard about dinner. It’s also perfect for a relaxed weekend meal when I want something hearty and comforting.
It’s basically taco night in casserole form—and I don’t think anyone in my house complains about that.
❤️ Why You’ll Love This Recipe
Weight Watchers-friendly
Approximately 7–9 WW Points per serving, depending on your personal plan and ingredients
Cheesy and satisfying
High in protein
Easy one-dish dinner
Family-friendly
Budget-friendly
Great for meal prep
Perfect for taco night
Delicious leftovers
Easy to customize
📋 Recipe Information
Course: Dinner, Main Course
Cuisine: Mexican-Inspired, Tex-Mex
Prep Time: 15 minutes
Cook Time: 25 minutes
Total Time: 40 minutes
Servings: 6
Difficulty: Easy
Estimated WW Points: 7–9 Points per serving
WW Points are personalized, so the exact value depends on your current plan and the specific ingredients you use.
🛒 Ingredients
1 pound 93% lean ground beef
1 small yellow onion, diced
2 cloves garlic, minced
1 packet reduced-sodium taco seasoning
1 cup chunky salsa
1 can (15 ounces) black beans, drained and rinsed
1 cup corn kernels
1 cup cooked brown rice
1 cup reduced-fat shredded Mexican-blend cheese
½ cup reduced-fat shredded cheddar cheese
Optional Toppings
Nonfat Greek yogurt
Shredded lettuce
Diced tomatoes
Fresh cilantro
Sliced jalapeños
Green onions
Fresh lime wedges
Extra salsa
🍳 Equipment Needed
Large skillet
9×13-inch baking dish
Wooden spoon
Mixing spoon
Cutting board
Sharp knife
👩🍳 How to Make Weight Watchers Cheesy Mexican Taco Casserole
Step 1: Preheat the Oven
Preheat your oven to 375°F (190°C).
Lightly spray a 9×13-inch baking dish with nonstick cooking spray.
🥩 Step 2: Brown the Beef
Heat a large skillet over medium-high heat.
Add the lean ground beef and cook for approximately 5–7 minutes, breaking it apart as it browns.
Drain any excess grease if necessary.
I like using lean ground beef here because it keeps the casserole hearty while helping keep the Points more manageable.
🧅 Step 3: Add Onion and Garlic
Add the diced onion to the skillet.
Cook for 3–4 minutes, until softened.
Add the minced garlic and cook for another 30–60 seconds.
By now, your kitchen should already smell like taco night.
🌮 Step 4: Add the Taco Seasoning
Sprinkle the taco seasoning over the beef mixture.
Stir well and cook for about 1 minute.
This is where all that familiar taco flavor really starts coming together.
🌽 Step 5: Add the Filling
Stir in:
Salsa
Black beans
Corn
Cooked brown rice
Mix everything thoroughly.
Let the mixture simmer for approximately 3–5 minutes.
Taste and adjust the seasoning if necessary.
🧀 Step 6: Assemble the Casserole
Transfer the taco mixture to the prepared baking dish.
Spread it evenly.
Sprinkle the Mexican-blend cheese over the top, followed by the cheddar.
Try to distribute the cheese all the way to the edges. Those crispy little golden corners are some of the best bites!
🔥 Step 7: Bake
Place the casserole in the oven.
Bake uncovered for approximately 20–25 minutes, until hot and bubbling and the cheese has completely melted.
If you like a golden cheese topping, broil for 1–2 minutes at the end.
Watch carefully so the cheese doesn’t burn.
🌿 Step 8: Rest and Serve
Remove the casserole from the oven and let it rest for 5 minutes.
Top with your favorite taco toppings.
I usually put several toppings on the table so everyone can make their own serving exactly how they like it.
💡 My Best Tips for This Casserole
Use Cooked Rice
Leftover rice is perfect for this recipe and makes dinner come together much faster.
Don’t Skimp on the Salsa
Salsa adds moisture and flavor while helping keep the casserole from becoming dry.
Shred Your Own Cheese
Freshly shredded reduced-fat cheese tends to melt more smoothly than some packaged varieties.
Keep the Toppings Fresh
Crunchy lettuce, juicy tomatoes, fresh cilantro, and lime add a wonderful contrast to the warm, cheesy casserole.
Let It Rest
Five minutes gives the casserole enough time to firm up slightly, making it much easier to scoop.
🌟 Delicious Variations
Chicken Taco Casserole
Replace the ground beef with shredded cooked chicken breast.
Turkey Taco Casserole
Use lean ground turkey instead of beef.
Spicy Cheesy Taco Casserole
Use hot salsa and add diced jalapeños or a pinch of cayenne.
Vegetarian Taco Casserole
Skip the meat and add an extra can of beans, bell peppers, zucchini, or mushrooms.
Extra-Vegetable Version
Add diced bell peppers, zucchini, spinach, or mushrooms to the beef mixture.
🥗 What to Serve With It
Because this casserole is already hearty, I like serving it with light, fresh sides.
Try:
Green salad
Cucumber and tomato salad
Steamed vegetables
Fresh fruit
Corn salad
Salsa
Lettuce and tomato
Lime wedges
A simple salad with lime juice is especially good alongside the warm, cheesy casserole.
🥡 Storage Instructions
Refrigerator
Allow leftovers to cool before transferring them to airtight containers.
Refrigerate for up to 4 days.
Freezer
Cool completely, then portion into freezer-safe containers.
Freeze for up to 2–3 months.
Thaw overnight in the refrigerator before reheating.
Reheating
Microwave individual portions for 60–90 seconds, checking and stirring as needed.
For a larger portion, cover with foil and reheat at 350°F (175°C) until hot.
If the casserole seems dry after refrigeration, add a spoonful of salsa before reheating.
📊 Approximate Nutrition Information
Per serving, based on 6 servings:
Calories: ~400
Protein: ~30g
Fat: ~15g
Carbohydrates: ~40g
Fiber: ~8g
Net Carbs: ~32g
Saturated Fat: ~5g
Sodium: ~750mg
Nutrition information is approximate and will vary according to the brands and ingredients used.
⭐ Estimated WW Points
Approximately 7–9 Points per serving.
Because WW Points are personalized, your actual Points may be different. For the most accurate number, enter your exact ingredients and brands into your WW recipe builder.
❓ Frequently Asked Questions
Can I make this casserole ahead of time?
Absolutely. Assemble it, cover it, and refrigerate for up to 24 hours. Add approximately 5–10 minutes to the baking time if it goes into the oven cold.
Can I use ground turkey?
Yes. Lean ground turkey works beautifully.
Can I leave out the rice?
Definitely. You can replace it with cauliflower rice or additional vegetables.
Can I use pinto beans instead of black beans?
Yes. Pinto beans, kidney beans, or a combination are all delicious.
Can I make this spicy?
Absolutely. Use hot salsa, jalapeños, cayenne, or your favorite hot sauce.
Can I add more cheese?
Of course. Just remember that additional cheese will change the WW Points.
Can I use tortilla chips?
You can crush a small amount over the top before serving for crunch, but this will increase the Points.
Is this good for meal prep?
Yes. Divide the casserole into individual containers after cooling and refrigerate for easy lunches throughout the week.
❤️ My Final Thoughts
This Weight Watchers Cheesy Mexican Taco Casserole is exactly the kind of recipe I love having in my back pocket.
It’s comforting enough for a weekend family dinner, easy enough for a stressful Tuesday night, and flexible enough that I can change it depending on what I have in the refrigerator.
That first weekend I made it, everyone loved it. We sat around the table with our bowls piled high, adding salsa, lettuce, tomatoes, and Greek yogurt while talking about our week.
Those are the meals I remember.
Not necessarily the fancy dinners or complicated recipes, but the simple ones where everyone goes back for seconds and nobody seems eager to leave the table.