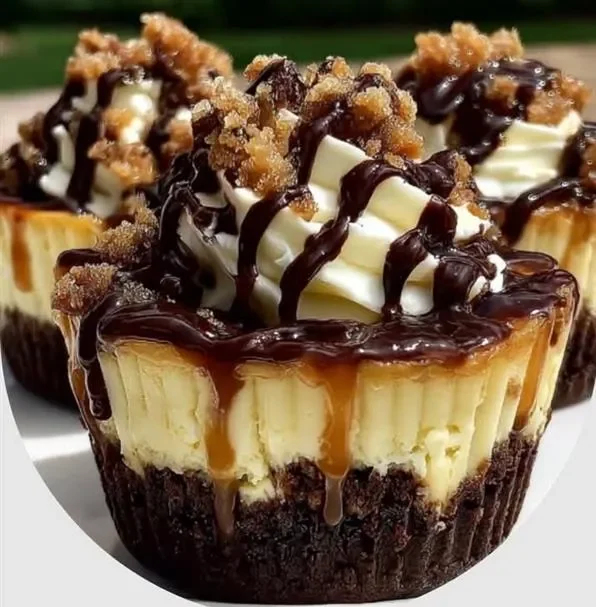
Rich, Creamy & Decadent No-Bake Dessert Bliss
Layers of fudgy brownies, whipped cheesecake, chocolate ganache, and caramel come together in this indulgent dessert cup — the ultimate treat for chocolate lovers who want it all in one bite.
🍽 Recipe Card
Servings: 6 dessert cups
Prep Time: 20 minutes
Chill Time: 1 hour
Total Time: 1 hour 20 minutes
Dietary Tags: No-Bake Dessert, Decadent, Crowd-Pleaser
✅ Ingredients
Brownie Layer:
-
Fudgy brownies, crumbled (about 2 cups)
Cheesecake Filling:
-
Cream cheese, softened
-
Powdered sugar
-
Vanilla extract
-
Heavy whipping cream, whipped to stiff peaks
Toppings:
-
Chocolate ganache (melted chocolate + heavy cream)
-
Caramel sauce
-
Extra brownie crumbs
🔢 Instructions
-
Make the Cheesecake Filling:
In a large bowl, beat cream cheese, powdered sugar, and vanilla together until smooth and creamy.
Gently fold in the whipped heavy cream until fully incorporated. Set aside. -
Assemble the Cups:
-
Start with a layer of crumbled brownies at the bottom of each dessert cup.
-
Spoon or pipe a layer of cheesecake filling over the brownies.
-
Drizzle with chocolate ganache and caramel sauce.
-
Repeat the layers until the cups are full.
-
-
Finish with Toppings:
Top each cup with extra brownie crumbs, a drizzle of ganache, and a swirl of caramel. -
Chill & Serve:
Refrigerate for at least 1 hour before serving for a firm, creamy texture.
💡 Quick Tips
-
Use fudgy brownies, not cakey ones, for a rich, chewy base.
-
For picture-perfect layers, use a piping bag for the cheesecake filling.
-
Chill longer (2–3 hours) for a more set, mousse-like texture.
🍰 Introduction
If you’ve ever craved the gooey comfort of a brownie and the creamy indulgence of cheesecake at the same time — this dessert was made for you. These Loaded Brownie Cheesecake Cups are no-bake, no-stress, and guaranteed to impress.
Perfect for parties, date nights, or when you just want a spoonful of joy, these layered dessert cups are rich, sweet, and completely irresistible.
👩🍳 Step-by-Step Cooking Guide
Step 1: Prepare the Cheesecake Filling
Beat softened cream cheese, powdered sugar, and vanilla until smooth. The mixture should be creamy and lump-free.
Then fold in whipped cream until light and airy — this creates that luscious, mousse-like texture.
Tip: Chill your mixing bowl before whipping cream for best volume.
Step 2: Layer the Brownies and Cheesecake
Crumble your brownies into bite-sized pieces and press a layer into the bottom of your serving cups.
Add a layer of cheesecake filling, smoothing it out or piping for a clean finish.
Drizzle chocolate ganache and caramel over each layer for richness.
Step 3: Finish & Chill
Repeat the layers until full, finishing with cheesecake on top. Garnish with more brownie crumbs, caramel, and ganache drizzle.
Refrigerate for at least an hour before serving — this step allows the layers to set beautifully.
🍫 Ingredient Details & Substitutions
-
Brownies: Homemade or store-bought — just make sure they’re fudgy. Avoid dry or cakey brownies.
-
Cream Cheese: Full-fat cream cheese gives the richest texture.
-
Whipped Cream: Whip until stiff peaks form. You can substitute stabilized whipped topping in a pinch.
-
Chocolate Ganache: Equal parts melted chocolate and warm heavy cream — whisk until smooth and glossy.
-
Caramel Sauce: Store-bought works fine, but homemade salted caramel adds an amazing contrast.
Equipment Alternatives:
-
No piping bag? Use a ziplock with the corner cut off.
-
Mason jars or dessert glasses both make great presentation options.
🍮 Variations & Serving Suggestions
Flavor Variations:
-
Add a layer of crushed Oreos for crunch.
-
Stir peanut butter into the cheesecake filling for a chocolate–peanut butter twist.
-
Sprinkle sea salt flakes over caramel for a salted caramel upgrade.
Serving Ideas:
-
Serve in mini dessert cups for parties.
-
Garnish with whipped cream and chocolate curls for a bakery-style finish.
-
For an ultra-decadent touch, top with a small brownie square.
Dietary Adaptations:
-
Gluten-Free: Use gluten-free brownies.
-
Low-Sugar: Replace powdered sugar with a powdered sweetener and use sugar-free caramel sauce.
🧊 Storage & Make-Ahead
-
Store: Keep refrigerated for up to 3 days in sealed containers.
-
Freeze: You can freeze for up to 2 months — thaw overnight before serving.
-
Make Ahead: Prepare up to a day in advance; just add ganache and caramel right before serving for the best look.
🧮 Nutrition (per cup, estimated)
Calories: 450 kcal | Carbs: 35g | Protein: 6g | Fat: 32g | Sugar: 27g
Dietary Highlights: No-Bake | Indulgent Dessert | Perfect for Entertaining
Allergens: Contains dairy, gluten (depending on brownie type).
❓ Frequently Asked Questions
Q: Can I make these ahead for a party?
A: Absolutely! Assemble up to 24 hours in advance, cover, and chill until serving.
Q: Can I skip the caramel?
A: Yes — it’ll still be rich and delicious. Or swap with raspberry sauce for a fruity twist.
Q: My cheesecake filling seems too soft — what can I do?
A: Chill longer or add a bit more whipped cream. The cold helps it set properly.
Q: Can I make this in one big dish instead of cups?
A: Definitely! Layer it in a trifle dish or 8×8 pan and serve scoops.
❤️ Story Behind the Recipe
This dessert started as a happy accident — leftover brownies, a batch of whipped cheesecake filling, and a craving for something extra. I layered them, added caramel and ganache for good measure, and instantly realized I’d created something dangerously good.
Now it’s my go-to for holidays, birthdays, or “just because” chocolate moments. Every spoonful is pure comfort — creamy, fudgy, and deeply satisfying.
💬 Reader Interaction
Tried these Loaded Brownie Cheesecake Cups?
Share your delicious creation with #SweetStackKitchen — or tell me how you customized your layers! Did you go caramel-crazy or double up the ganache? I can’t wait to see your dessert magic! 🍫✨