Introduction: The Magic of Cherries in the Snow
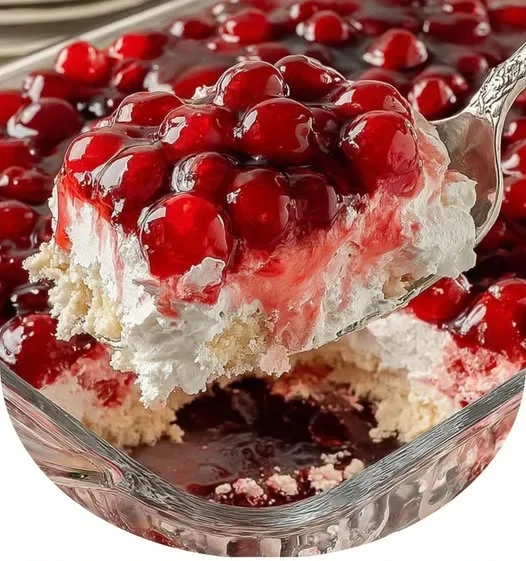
Among all the beautiful, nostalgic, and crowd-pleasing holiday desserts, few creations capture the spirit of winter quite like Cherries in the Snow. With its snowy white layers of fluffy cream, soft pieces of angel food cake, and a vibrant, ruby-red crown of sweet cherry pie filling, this dessert is a visual and flavorful celebration of the season. Each bite is a perfect blend of lightness, fruitiness, creaminess, and nostalgia—exactly what a holiday dessert should be.
Though it looks stunning and tastes decadent, this dessert is proof that you don’t need complicated techniques or expensive ingredients to create something spectacular. It’s simple, elegant, and ideal whether you’re preparing for a holiday gathering, a potluck, a family dinner, or simply craving something refreshing and creamy.
In this full-length guide, you’ll discover everything you need to know to prepare the perfect Cherries in the Snow Dessert, from ingredients and instructions to pro tips, variations, serving suggestions, storage advice, and a full breakdown of preparation time and calories.
Let’s begin your journey toward creating this festive masterpiece! 🍒✨
Ingredients (Exact Measurements)
To make the classic and irresistibly creamy Cherries in the Snow Dessert, you will need the following ingredients:
Cream Layer
-
12 oz block-style cream cheese, room temperature
-
¾ cup powdered sugar, sifted
-
⅓ cup whole milk
-
½ teaspoon vanilla extract
-
8 oz frozen whipped topping, thawed (Cool Whip brand recommended)
Cake Layer
-
1 pre-baked angel food cake, torn into ¾–1-inch pieces
-
(A 15-ounce, 9-inch store-bought cake works perfectly)
-
Fruit Layer
-
42 oz cherry pie filling
-
Two 21-oz cans, Comstock brand used for best texture and flavor
-
Preparation Time
| Step | Time |
|---|---|
| Preparing creamy filling | 8 minutes |
| Folding in whipped topping | 2 minutes |
| Assembling layers | 10 minutes |
| Chilling (minimum) | 2 hours |
| Total active time | 20 minutes |
| Total including chilling | 2 hours 20 minutes |
This dessert requires minimal effort but does need proper chilling time for the flavors and textures to harmonize beautifully.
How to Prepare Cherries in the Snow Dessert (Step-by-Step Method)
Below is the complete method to ensure your dessert turns out perfectly fluffy, creamy, and stunning every time.
Step 1 — Make the Creamy Filling
This luxurious, silky mixture is the heart of the dessert.
-
Beat the cream cheese
In a large mixing bowl, beat the softened cream cheese using a hand mixer.
Continue mixing until the texture becomes smooth, lump-free, and fluffy.
Room-temperature cream cheese is essential to avoid graininess. -
Add powdered sugar
Add the sifted powdered sugar gradually.
Continue mixing until fully combined and smooth. -
Pour in milk + vanilla
Add the whole milk and vanilla extract to the bowl.
Mix again until the filling has a smooth, pourable consistency with no lumps.
Step 2 — Fold in the Whipped Topping
This step creates the iconic light, cloud-like texture.
-
Add the thawed Cool Whip to the cream mixture.
-
Using a silicone spatula, gently fold the whipped topping into the mixture.
-
Continue folding slowly until fully blended and airy.
Do not overmix!
Overmixing will deflate the filling and make it dense instead of light and fluffy.
Step 3 — Assemble the Dessert
A beautiful layered arrangement gives this dessert its signature appearance.
You can assemble it in:
A clear trifle dish
A 9×13-inch baking dish
A glass bowl
Individual cups or parfait glasses
Layering order:
-
Bottom layer: Angel food cake
Spread half of the torn angel food cake pieces evenly on the bottom. -
Middle layer: Cream mixture
Spoon half of your cream mixture over the cake.
Spread evenly without pushing down too much. -
Fruit layer: Cherry pie filling
Spoon half of the cherry pie filling over the cream layer. -
Repeat layers in the same order:
-
Remaining cake
-
Remaining cream
-
Finish with the remaining cherry pie filling on top
-
The final result should resemble a snowy mountain crowned with red cherries—the exact look that gives the dessert its festive name!
Step 4 — Chill
Place the assembled dessert into the refrigerator for at least 2 hours, though overnight chilling is ideal.
Chilling allows:
-
flavors to blend
-
layers to firm
-
cake to soften
-
cream to stabilize
The texture becomes significantly better after several hours, so resist the urge to dig in early!
Serving Your Cherries in the Snow Dessert
Once fully chilled, the dessert is ready to serve.
You can:
-
Scoop it into bowls
-
Cut into soft, creamy squares (for 9×13 pans)
-
Serve in parfait glasses for a more elegant presentation
This dessert is best served very cold, as the cream layer maintains its structure and tastes lighter.
It pairs wonderfully with:
-
Espresso or coffee
-
Hot chocolate
-
Vanilla ice cream (optional)
-
A glass of cold milk
Tips for Success: Expert Advice
To ensure your dessert turns out perfect every time, follow these tried-and-true tips:
✔ Use room-temperature cream cheese
Cold cream cheese makes the filling lumpy.
Sift the powdered sugar
This prevents small clumps and keeps the mixture silky.
Don’t overmix once the whipped topping is added
Your goal is airy, cloud-like cream—not something dense.
Chill for at least 2 hours
Overnight chilling produces the best results.
Angel food cake should be torn, not cut
Torn pieces absorb cream better and create a softer, more natural texture.
Don’t press the layers down
Allow everything to stay fluffy.
✔ Use quality cherry pie filling
Brands like Comstock deliver consistent texture and flavor.
Variations and Flavor Twists
This dessert is extremely flexible. Here are some fun ideas to explore:
Berry Explosion
Swap cherry pie filling for:
-
strawberry pie filling
-
mixed berry topping
-
raspberry preserves
Black Forest Variation
Add:
-
chocolate shavings
-
a thin drizzle of chocolate syrup
-
layers of chocolate cake instead of angel food cake
Tropical Snow
Use:
-
crushed pineapple, drained
-
toasted coconut
-
yellow cake pieces instead of angel food cake
Peaches & Cream Snow
Add canned peaches (drained) between the cream and cake layers.
Lemon Snow Delight
Add:
-
lemon zest to the cream layer
-
lemon curd in addition to cherries
Birthday Snow Cake
Top with:
-
rainbow sprinkles
-
white chocolate curls
Each variation adds a unique touch while preserving the dessert’s signature creaminess and charm.
Storage Instructions
Refrigerator
-
Store covered for up to 3 days.
-
The cake will soften more over time — still delicious, just creamier.
Freezer
Not recommended.
The whipped topping and cream cheese texture changes when frozen.
Calories and Nutrition (Approximation per serving)
The following nutritional estimates are based on 12 servings:
| Component | Approx. Calories |
|---|---|
| Cream cheese | 240 calories |
| Powdered sugar | 300 calories |
| Whole milk | 50 calories |
| Cool Whip | 500 calories |
| Angel food cake | 1,000 calories |
| Cherry pie filling | 1,100 calories |
| Total | 3,190 calories |
| Per serving (12 servings) | ≈ 265 calories per serving |